Tuesday, December 16, 2014

How to remove and recreate all virtual directories in Exchange 2007

Occasionally, IIS gets messed up.  It's fairly simple to just recreate all of your virtual directories from scratch instead of banging your head against the wall trying to chase down the issue.  In this example, our external and internal URL is mail.company.com.  Our Internal server name is "MailServer".  Our NetBios domain name is "NetBiosDomainName", so change all of these to fit your environment.

Here's how it's done-

Run the following commands in Exchange Management Shell-

Get-AutodiscoverVirtualDirectory
Get-OABVirtualDirectory
Get-OWAVirtualDirectory
Get-WebServicesVirtualDirectory
Get-ActiveSyncVirtualDirectory
Get-UMVirtualDirectory


Now.. You want to remove the existing Virtual Directories but change the website to the one listed in these commands.  In my environment it is "Default Web Site"-

Remove-OWAVirtualDirectory -Identity "Owa (Default Web Site)" -Confirm:$false
Remove-OWAVirtualDirectory -Identity "Exadmin (Default Web Site)" -Confirm:$false
Remove-OWAVirtualDirectory -Identity "Exchange (Default Web Site)" -Confirm:$false
Remove-OWAVirtualDirectory -Identity "Exchweb (Default Web Site)" -Confirm:$false
Remove-OWAVirtualDirectory -Identity "Public (Default Web Site)" -Confirm:$false
Remove-WebServicesVirtualDirectory -Identity "EWS (Default Web Site)" -Confirm:$false
Remove-ActiveSyncVirtualDirectory -Identity "Microsoft-Server-ActiveSync (Default Web Site)" -Confirm:$false
Remove-OabVirtualDirectory -Identity "OAB (Default Web Site)" -Force:$true -Confirm:$false
Remove-UMVirtualDirectory -Identity "UnifiedMessaging (Default Web Site)" -Confirm:$false
Remove-AutodiscoverVirtualDirectory -Identity "Autodiscover (Default Web Site)" -Confirm:$false

Verify the directories have been remove-
Get-AutodiscoverVirtualDirectory
Get-OABVirtualDirectory
Get-OWAVirtualDirectory
Get-WebServicesVirtualDirectory
Get-ActiveSyncVirtualDirectory
Get-UMVirtualDirectory


Now create the new virtual directories.  In this example, our external and internal URL is mail.company.com.  Our Internal server name is "MailServer".  Our NetBios domain name is "NetBiosDomainName", our website is "Default Web Site".  Cange all of these to fit your environment.

New-OWAVirtualDirectory -WebsiteName "New Web Site" -OwaVersion "Exchange2007" -ExternalAuthenticationMethods Fba

Set-OWAVirtualDirectory -InternalUrl "https://mail.company.com/owa/" -ClientAuthCleanupLevel "Low" -LogonFormat "UserName" -DefaultDomain “NetBiosDomainName” -Identity "Owa (Default Web Site)"

New-OWAVirtualDirectory -WebsiteName "New Web Site" -OwaVersion "Exchange2003or2000" -VirtualDirectoryType "Exadmin" -ExternalAuthenticationMethods Fba

New-OWAVirtualDirectory -WebsiteName "New Web Site" -OwaVersion "Exchange2003or2000" -VirtualDirectoryType "Mailboxes" -ExternalAuthenticationMethods Fba

New-OWAVirtualDirectory -WebsiteName "New Web Site" -OwaVersion "Exchange2003or2000" -VirtualDirectoryType "Exchweb" -ExternalAuthenticationMethods Fba

New-OWAVirtualDirectory -WebsiteName "New Web Site" -OwaVersion "Exchange2003or2000" -VirtualDirectoryType "PublicFolders" -ExternalAuthenticationMethods Fba

New-WebServicesVirtualDirectory -WebsiteName "New Web Site" -InternalUrl "https://mail.company.com/EWS/Exchange.asmx" -basicauthentication 1 -windowsauthentication 1

New-ActiveSyncVirtualDirectory -WebsiteName "New Web Site" -InternalUrl "https://mail.company.com/Microsoft-Server-ActiveSync" -ExternalAuthenticationMethods Basic -InternalAuthenticationMethods Basic

New-OabVirtualDirectory -WebsiteName "New Web Site" -InternalUrl "https://mail.company.com/OAB"

Set-OabVirtualDirectory -PollInterval "30" -Identity "oab (New Web Site)"

New-UMVirtualDirectory -WebsiteName "New Web Site" -InternalUrl "https://mail.company.com/UnifiedMessaging/Service.asmx"

New-AutodiscoverVirtualDirectory -WebsiteName "New Web Site" -InternalUrl "https://mail.company.com/Autodiscover/Autodiscover.xml" -BasicAuthentication 1 -WindowsAuthentication 1

Set-ClientAccessServer -Identity “MailServer” -AutoDiscoverServiceInternalUri "https://mail.company.com2007/Autodiscover/Autodiscover.xml"

Set-OfflineAddressBook "Default Offline Address Book" -VirtualDirectories "MailServer\OAB (New Web Site)" -Versions Version2,Version3,Version4

Verify the directories have been created-
Get-AutodiscoverVirtualDirectory
Get-OABVirtualDirectory
Get-OWAVirtualDirectory
Get-WebServicesVirtualDirectory
Get-ActiveSyncVirtualDirectory
Get-UMVirtualDirectory


Run the Command Prompt with elevated permissions and perform run IISreset.
How to recreate all IIS directories on a new IIS 7 website (Including RPC and RPC with Cert) in Exchange 2007

I recently had an issue where my IIS website was corrupt and not operable.  My solution was to create a new IIS website - let's call it "New Web Site" and call the old "Default Web Site".  In this example, our external and internal URL is mail.company.com.  Our Internal server name is "MailServer".  Our NetBios domain name is "NetBiosDomainName", so change all of these to fit your environment.

Here's how it's done-

New-OWAVirtualDirectory -WebsiteName "New Web Site" -OwaVersion "Exchange2007" -ExternalAuthenticationMethods Fba

Set-OWAVirtualDirectory -InternalUrl "https://mail.company.com/owa/" -ClientAuthCleanupLevel "Low" -LogonFormat "UserName" -DefaultDomain “NetBiosDomainName” -Identity "Owa (Default Web Site)"

New-OWAVirtualDirectory -WebsiteName "New Web Site" -OwaVersion "Exchange2003or2000" -VirtualDirectoryType "Exadmin" -ExternalAuthenticationMethods Fba

New-OWAVirtualDirectory -WebsiteName "New Web Site" -OwaVersion "Exchange2003or2000" -VirtualDirectoryType "Mailboxes" -ExternalAuthenticationMethods Fba

New-OWAVirtualDirectory -WebsiteName "New Web Site" -OwaVersion "Exchange2003or2000" -VirtualDirectoryType "Exchweb" -ExternalAuthenticationMethods Fba

New-OWAVirtualDirectory -WebsiteName "New Web Site" -OwaVersion "Exchange2003or2000" -VirtualDirectoryType "PublicFolders" -ExternalAuthenticationMethods Fba

New-WebServicesVirtualDirectory -WebsiteName "New Web Site" -InternalUrl "https://mail.company.com/EWS/Exchange.asmx" -basicauthentication 1 -windowsauthentication 1

New-ActiveSyncVirtualDirectory -WebsiteName "New Web Site" -InternalUrl "https://mail.company.com/Microsoft-Server-ActiveSync" -ExternalAuthenticationMethods Basic -InternalAuthenticationMethods Basic

New-OabVirtualDirectory -WebsiteName "New Web Site" -InternalUrl "https://mail.company.com/OAB"

Set-OabVirtualDirectory -PollInterval "30" -Identity "oab (New Web Site)"

New-UMVirtualDirectory -WebsiteName "New Web Site" -InternalUrl "https://mail.company.com/UnifiedMessaging/Service.asmx"

New-AutodiscoverVirtualDirectory -WebsiteName "New Web Site" -InternalUrl "https://mail.company.com/Autodiscover/Autodiscover.xml" -BasicAuthentication 1 -WindowsAuthentication 1

Set-ClientAccessServer -Identity “MailServer” -AutoDiscoverServiceInternalUri "https://mail.company.com2007/Autodiscover/Autodiscover.xml"

Set-OfflineAddressBook "Default Offline Address Book" -VirtualDirectories "MailServer\OAB (New Web Site)" -Versions Version2,Version3,Version4


Now.. RPC and RPC with Cert.  You probably could just re-install RPC, but if you'd prefer not to here is how I recreated them-

Make a backup of the ApplicationHost.config in C:\Windows\System32\inetsrv\config.

Edit the file in Notepad and copy the following from the previus site to the new site.  DON'T use this text, use the text from your old site "Default Web Site".  Change the name of that section to your new site and paste it in that section of the file.

<site name="<Default Web Site>" id=...>
...
<application path="/Rpc" applicationPool="SomeAppPool">
       <virtualDirectory path="/" physicalPath="C:\Windows\System32\RpcProxy" />
</application>
<application path="/RpcWithCert" applicationPool="SomeAppPool">
        <virtualDirectory path="/" physicalPath="C:\Windows\System32\RpcProxy" />
</application> 
...
</site>

Next, copy the following from the previous site to the new site.  DON'T use this text, use the text from your old site "Default Web Site".  Change the name of that section to your new site and paste it in that section of the file.

Replace the old site with the new one like this-
<location path="<Default Web Site>/RpcWithCert"> --> <location path="<New Web Site>/RpcWithCert">

<location path="<Default Web Site>/Rpc">  --> <location path="<New Web Site>/Rpc">

<location path="<Default Web Site>/Rpc">
        <system.webServer>
            <directoryBrowse enabled="false" showFlags="Date, Time, Size, Extension" />
            <handlers accessPolicy="Execute">
                <add name="RPCPROXY" path="*" verb="*" modules="IsapiModule" scriptProcessor="C:\Windows\system32\RpcProxy\RpcProxy.dll" requireAccess="Execute" />
            </handlers>
            <serverRuntime uploadReadAheadSize="0" />
            <defaultDocument enabled="true" />
            <modules>
                <add name="PasswordExpiryModule" />
            </modules>
            <security>
                <requestFiltering>
                    <requestLimits maxAllowedContentLength="2147483648" />
                </requestFiltering>
                <authentication>
                    <anonymousAuthentication enabled="false" />
                    <basicAuthentication enabled="false" />
                    <windowsAuthentication enabled="true" useKernelMode="false" />
                </authentication>
                <access sslFlags="Ssl, Ssl128" />
            </security>
            <httpErrors>
                <remove statusCode="401" />
                <error statusCode="401" path="C:\Windows\system32\RpcProxy\Error401.txt" responseMode="File" />
            </httpErrors>
        </system.webServer>
    </location>


<location path="<Default Web Site>/RpcWithCert">
        <system.webServer>
            <directoryBrowse enabled="false" showFlags="Date, Time, Size, Extension" />
            <handlers accessPolicy="Execute">
                <add name="RPCPROXY" path="*" verb="*" modules="IsapiModule" scriptProcessor="C:\Windows\system32\RpcProxy\RpcProxy.dll" requireAccess="Execute" />
            </handlers>
            <defaultDocument enabled="true" />
            <security>
                <authentication>
                    <anonymousAuthentication enabled="false" />
                    <basicAuthentication enabled="false" />
                    <clientCertificateMappingAuthentication enabled="true" />
                    <digestAuthentication enabled="false" />
                    <windowsAuthentication enabled="false" useKernelMode="false" />
                    <iisClientCertificateMappingAuthentication enabled="true" />
                </authentication>
                <access sslFlags="Ssl, SslNegotiateCert, SslRequireCert, Ssl128" />
                <requestFiltering>
                    <requestLimits maxAllowedContentLength="2147483648" />
                </requestFiltering>
            </security>
            <serverRuntime uploadReadAheadSize="0" />
            <modules>
                <add name="PasswordExpiryModule" />
            </modules>
            <httpErrors>
                <remove statusCode="401" />
                <error statusCode="401" path="C:\Windows\system32\RpcProxy\Error401.txt" responseMode="File" />
            </httpErrors>
        </system.webServer>
    </location> 


Run the Command Prompt with elevated permissions and perform run IISreset.


Monday, December 8, 2014

How to set up a Linux (Ubuntu) Ubiquiti Unifi (Unifi 3.x, Ubuntu 12.04)

This is a summary of how to set up a Ubiquiti Unifi controller on a Ubuntu Linux box.

1) Install Ubuntu Server 12.04, during the install select "OpenSSH Server" so you can remote into the server with Putty.

2) Once the operating system is up and running, set up a static IP on the box.

          sudo nano /etc/network/interfaces

          Change this-
                    auto eth0
                    iface eth0 inet dhcp

          To your static ip-
                    auto eth01
                    iface eth0 inet static
                              address 192.168.0.3
                              netmask 255.255.255.0
                              network 192.168.0.0
                              broadcast 192.168.0.255
                              gateway 192.168.0.1
                              dns-search example.com
                              dns-nameservers 8.8.8.8 4.2.2.2

          (You can omit the dns-search if you don't need a domain suffix,)

          Simply restart your server or you can restart the networking with this command-
                    sudo ifdown eth0 && sudo ifup eth0

3) Update the OS.
          sudo apt-get update

4) Update the sources.list to include the Unifi repository.
          Open the file-
                    sudo nano /etc/apt/sources.list

          Add the following line at the bottom of the file.
 Updated-
deb http://www.ubnt.com/downloads/unifi/debian stable ubiquiti
  
 #OLD-             deb http://www.ubnt.com/downloads/unifi/distros/deb/ubuntu ubuntu ubiquiti

          Hit <Control> <X> to exit and <Y> to save.

          Add the GPG Key
                     sudo apt-key adv --keyserver keyserver.ubuntu.com --recv C0A52C50

          Update the OS again.
                    sudo apt-get update

5) Install Unifi using apt-get.
                    sudo apt-get install unifi

          If you want the latest version do-
                    sudo apt-get install unifi-rapid

6) If Unifi doesn't start and says "Cannot locate Java Home", do the following-
          Open the init script.
                    sudo nano /etc/init.d/unifi
          Look for the variable "JAVA_HOME" and change the path to include the -amd64.
                    Change- JAVA_HOME=/usr/lib/jvm/java-6-openjdk
                    To- JAVA_HOME=/usr/lib/jvm/java-6-openjdk-amd64
          
          Hit <Control> <X> to exit and <Y> to save.

          Attempt to start Unifi again.
                    sudo service unifi restart

7) Open the unifi controller by going to the IP of the box on port 8443 (with https:).
          https://192.168.0.3:8443/


----

To upgrade to 5.0-
# out the old entry in /etc/apt/sources.list
Add-
deb http://www.ubnt.com/downloads/unifi/debian unifi5 ubiquiti
Then-
apt-key adv --keyserver keyserver.ubuntu.com --recv C0A52C50
apt-get update
sudo apt-get install --only-upgrade unifi

Friday, December 5, 2014

How to add a list of domains to a Send Connector in Exchange 2007 (Forced TLS) (CSV File)

I had a client with a scoped send connector to enforce outbound TLS to their partner company.  I needed to add a huge list of domains to the send connector.  I only tested this with Exchange 2007 but I'm sure it's similar for 2010/2013.

Create a file with Notepad and name the file with the extension .csv.  For my example, we'll use test.csv and we'll save it in C:\temp.  The format of the file should be-

Name
test1.com
test2.com
test3.com
test4.com

Use the following commands in powershell o import the domains to your Send Connector.  For my example, our send connector will be called "TestSend".

$al = (Get-SendConnector -Identity TestSend).AddressSpaces
$al += (Import-CSV c:\temp\test.csv) | ForEach {$_.Name}
Set-SendConnector TestSend -AddressSpace $al3


Wednesday, December 3, 2014

Changing Ubuntu Server IP address from DHCP to Static (including DNS)

I know this is a silly one but some seem to struggle with this and there are some conflicting instructions out there.

sudo nano /etc/network/interfaces


Change this-
auto eth0
iface eth0 inet dhcp

To your static ip-
auto eth0
iface eth0 inet static
        address 192.168.0.3
        netmask 255.255.255.0
        network 192.168.0.0
        broadcast 192.168.0.255
        gateway 192.168.0.1
        dns-search example.com
        dns-nameservers 8.8.8.8 4.2.2.2


(You can omit the dns-search if you don't need a domain suffix,)

Simply restart your server.  If you'd prefer not to, you can restart the networking with this command-
sudo ifdown eth0 && sudo ifup eth0


Cisco ASA Restrict VPN traffic to 1 IP on Site to Site (L2L) Tunnel

I was recently asked to restrict access on a VPN tunnel to one IP address, 192.168.240.13.  Here is how I did it-


access-list restrict extended permit ip host 192.168.240.13 any

group-policy Tunnel internal
group-policy Tunnel attributes
 vpn-filter value restrict

tunnel-group 2.2.2.2 general-attributes
 default-group-policy Tunnel

Setting up a Site to Site (L2L) VPN Tunnel on a Cisco ASA 5505 when the remote end has an overlapping (conflicting) IP Range

A scenario I commonly run into is a client who wants to set up a Site to Site IPSec VPN tunnel to a vendor but cannot use their current IP scheme because it overlaps with another one of their business partners.  This is a fairly simple setup.

Public IP- 1.1.1.1
Private LAN- 192.168.0.0/24
Remote VPN LAN- 192.168.250.0/24
Remote Host IP- 2.2.2.2
Pre-Shared-Key- Key

So we're going to make up a "Natted" LAN for use on this tunnel.  We will use- 192.168.100.0/24.
Natted LAN- 192.168.100.0

First thing, create some object groups.

ASA (config)# object network LocalSubnet
ASA(config-network-object)# subnet 192.168.0.0 255.255.255.0
ASA (config)# object network LocalSubnetNAT
ASA(config-network-object)# subnet 192.168.100.0 255.255.255.0
ASA (config)# object network RemoteSubnet
ASA(config-network-object)# subnet 192.168.250.0 255.255.255.0


Next we create a NAT rule to un-NAT to that address.

ASA (config)# nat (inside,outside) source static LocalSubnet LocalSubnetNAT destination static RemoteSubnet RemoteSubnet


Now we create an ACL for the VPN tunnel.  Since VPN tunnels are processed after NAT, it will be from the Natted subnet to the remote subnet.

ASA (config)# access-list Tunnel extended permit ip object LocalSubnetNAT object RemoteSubnet


Now we build the tunnel like we normally would-
ASA (config)# crypto ipsec ikev1 transform-set ESP-3DES-SHA esp-3des esp-sha-hmac
ASA (config)# crypto map outside_map 10 match address Tunnel
ASA (config)# crypto map outside_map 10 set peer 2.2.2.2
ASA (config)# crypto map outside_map 10 set ikev1 transform-set ESP-3DES-SHA
ASA (config)# crypto map outside_map interface outside
ASA (config)# crypto ikev1 enable outside
ASA (config)# crypto ikev1 policy 10
ASA(config-ikev1-policy)# authentication pre-share
ASA(config-ikev1-policy)# encryption 3des
ASA(config-ikev1-policy)# hash sha
ASA(config-ikev1-policy)# group 2
ASA(config-ikev1-policy)# lifetime 86400
ASA (config)# tunnel-group 2.2.2.2 type ipsec-l2l
ASA (config)# tunnel-group 2,2,2,2 ipsec-attributes
ASA(config-tunnel-ipsec)# ikev1 pre-shared-key Key


That's it!  


Friday, October 31, 2014

Windows Time Hell

I'm kind of over windows time issues, so I found this little bad boy!  This thing is great, rock solid time sync, no headaches.

http://www.timesynctool.com/


Friday, August 1, 2014

You move a mailbox from Exchange 2010 / 2013 to a new server or Office 365 and you can't get rid of a shared mailbox that is automapped.

So you move a shared mailbox from Exchange to either a new server or to Office 365.  After, a user still sees a shared mailbox automapped to their profile due to the exchange automapping feature.  You aren't able to map the moved mailbox to their profile.

An easy solution is to simply remove it from the attributes in Active Directory.

 - Open Active Directory Users and Computers.
 - Click the View menu and select Advanced Features.
 - Open the user in question.
 - Click on the Attribute editor tab.
 - Scroll down to msExchDelegateListLink, open it.
 - Remote the mailbox that is automapped.


Wednesday, July 2, 2014

How to set up an Ubuntu Secondary (Slave) DNS Server as a Secondary DNS Server to your Windows Active Directory Environment

Recently I had a client ask me to configure an Ubuntu server as a secondary DNS server to their AD environment to give a remote office local DNS.  Here is how I did it-

sudo apt-get install bind9

cd /etc/bind
sudo nano named.conf.local

     zone "domain.local" IN {
             type slave;
             file "/var/cache/bind/domain.local.db";
             allow-transfer { 192.168.0.0/16; };
             allow-notify { 192.168.2.97; };
             check-names ignore;
             masters { 192.168.2.97; };
     };

     zone "2.168.192.in-addr.arpa" IN {
             type slave;
             file "/var/cache/bind/2.168.192.db";
             allow-transfer { 192.168.0.0/16; };
             allow-notify { 192.168.2.97; };
             masters { 192.168.2.97; };
     };

(Note- Replace domain.local with your AD domain, replace the 192.168.0.0/16 with your internal IP subnet, replaced 192.168.2.97 with your internal DC that you want to transfer DNS from.)

sudo nano named.conf.options

     allow-query { any; };
     allow-recursion { any; };

     forwarders {
             8.8.8.8;
             4.2.2.2;
     };


On your AD server, go into DNS, right click on the internal DNZ zone, and add the IP of your Ubuntu box to the zone transfers tab.  Do the same for the reverse zone.

Restart Bind
sudo /etc/init.d/bind9 restart

That's it!!!

Monday, May 26, 2014

How to move Public Folders from Exchange 2010 to Exchange 2013

This is my write up on moving public folders from 2010 to 2013.

From the Exchange 2010 server, run the following
     Get-PublicFolder –Recurse | ConvertTo-CSV >C:\Exchange2010-PFStructure.csv
     Get-PublicFolder -Recurse | Get-PublicFolderStatistics | ConvertTo-Csv >C:\Exchange2010-PFStatistics.csv
     Get-PublicFolder -GetChildren | Get-PublicFolderClientPermission | Select-Object Identity,User -ExpandProperty AccessRights | ConvertTo-CSV >C:\Exchange2010-PFPermissions.csv

From the Exchange 2010 server, make sure PublicFoldersLockedForMigration and PublicFolderMigrationComplete is set to False
     Get-OrganizationConfig  | fl *Migration*
If this parameter is set to True , Run the below command to Change it to False
     Set-OrganizationConfig -PublicFoldersLockedforMigration:$false -PublicFolderMigrationComplete:$false

From the Exchange 2013 server, make sure there is no PublicFolderMigrationRequest and PublicFolder Mailbox
     Get-PublicFolderMigrationRequest

     Get-Mailbox -PublicFolder

Copy the following files to from the Exchange 20130 Scripts folder (C:\Program Files\Microsoft\Exchange Server\V15\Scripts) to the Exchange 2010 Scripts Folder (C:\Program Files\Microsoft\Exchange Server\V14\Scripts)
     Export-PublicFolderStatistics.strings
     Export-PublicFolderStatistics
     PublicFolderToMailboxMapGenerator.strings
     PublicFolderToMailboxMapGenerator


On the Exchange 2010 server, open the Exchange Management Shell and navigate to C:\Program Files\Microsoft\Exchange Server\V14\Scripts, create the folder C:\PFMigration and run the following scripts-
     .\PublicFolderToMailboxMapGenerator.ps1 -MailboxSize 5000000000 -ImportFile C:\PFMigration\Exchange2010-PFtoSize.csv -ExportFile C:\PFMigration\Exchange2010-PFtoMailbox.csv

Open file C:\PFMigration\Exchange2010-PFtoMailbox.csv with notepad, change the PF Mailbox name to one you wish (PFMailbox)

Copy the C:\PFMigration folder and the CSV from your Exchange 2010 Server to your Exchange 2013 Server.

On the Exchange 2013 Server, create your Public Folder Migration Request.  If required you can add the parameters -AcceptLargeDataLoss –BadItemLimit 
     New-PublicFolderMigrationRequest -SourceDatabase (Get-PublicFolderDatabase –Server EXCH2010) -CSVData (Get-Content C:\PFMigration\Exchange2010-PFtoMailbox.csv -Encoding Byte)

Check the status of migration request.
     Get-PublicFolderMigrationRequest | Get-PublicFolderMigrationRequestStatistics -IncludeRepor

When it fails, use this command to find out why-
     Get-PublicFolderMigrationRequest | Get-PublicFolderMigrationRequestStatistics -IncludeReport | FL

You might see this, it means you have mail enabled folders that have a space in the alias field or a space before or after the alias.  Go to the public folder manager, go to the peoperties of the mail enabled public folder listed and change the alias to have no spaces.
"Error: Property expression "B list" isn't valid. Valid values are: Strings formed
with characters from A to Z (uppercase or lowercase), digits from 0 to 9, !, #, $,
%, &, ', *, +, -, /, =, ?, ^, _, `, {, |, } or ~. One or more periods may be
embedded in an alias, but each period should be preceded and followed by at least
one of the other characters. Unicode characters from U+00A1 to U+00FF are also
valid in an alias, but they will be mapped to a best-fit US-ASCII string in the
e-mail address, which is generated from such an alias."

Once you fixed this, resume the migration-
     Get-PublicFolderMigrationRequest | Resume-PubliFolderMigrat

If you forgot to set the baditemlimit or set it too small, you can change it with this command.
     Set-PublicFolderMigrationRequest -Identity \PublicFolderMigration -baditemlimit 200
     Get-PublicFolderMigrationRequest | Resume-PubliFolderMigrat

Once the PublicFolderMigrationRequest shows autosuspended, on the Exchange 2010 server set PublicFoldersLockedForMigration to True.  This may take a couple of hours.

     Set-OrganizationConfig -PublicFoldersLockedForMigration:$true

On the Exchange 2013 server, complete the migration.
     Get-PublicFolderMigrationRequest  -Identity \PublicFolderMigration | Set-PublicFolderMigrationRequest -PreventCompletion:$false

     Get-PublicFolderMigrationRequest  -Identity \PublicFolderMigration | Resume-PublicFolderMigrationRequest

Now Verify PublicFolderMigrationRequest is 100 Percent Complete
     Get-PublicFolderMigrationRequest | Get-PublicFolderMigrationRequestStatistics
     Get-PublicFolder –Recurse
Log on to OWA, right Click on Favorites, click Add Public Folder and verify you are able to access the migrated Data


Wednesday, April 9, 2014

Heartbleed

What is Heartbleed?
Heart is a serious vulnerability discovered in OpenSSL (a cryptographic software library used by most devices to implement SSL and TLS code).

What does it do?
The Heartbleed bug exposes up to 64k memory of the server it is running on allowing an attacker to read the memory of the system.  This enables anyone on the Internet to find things like private keys, passwords, bank account information, etc.

Where did it come from?
Heartbleed was introduced by a new feature added to TLS called the Heartbeat Extension which adds the capability to keep TLS connections alive without continuous data transfer.

What servers does this affect?
Mostly Apache servers, or any other devices that use OpenSSL libraries versions 1.01 and 1.0.2-beta.

Does it affect Windows Servers?
It does not affect Microsoft’s IIS (Internet Information Services) or Exchange Server.  It would affect apache on windows using OpenSSL.

How do I know if a server is affected?
Test it!  http://filippo.io/Heartbleed/

If I have an affected server, what do I do about it?

Patch it, version 1.0.1g resolves the issue.  You should also re-key your SSL certificate.

Saturday, March 29, 2014

You attempt to copy a file via FTP to your Cisco ASA and receive the error "(No more processes)"

You attempt to copy a file via FTP to your Cisco ASA and receive the error "(No more processes)".  This cryptic error COULD just mean 'file not found', when the file name isn't present this error is returned.  Not sure why Cisco couldn't tell you this, but this is the message you would receive.

Thursday, March 27, 2014

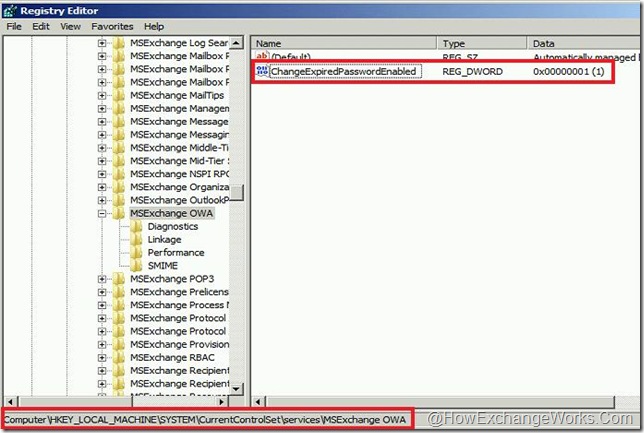
Allow users to change their expired passwords via OWA.

One common scenario is that user's passwords expire when they are out of town or remote, and they are unable to change their password.  Starting with Exchange 2007 Service Pack 3 (and 2010/2013), users have the ability to change their expired password via OWA if you set a registry key to turn this functionality on.

 - On your Exchange CAS server, open regedit and navigate
to HLKM\SYSTEM\CurrentControlSet\Services\MSExchange OWA

 - Create a DWORD value called ChangeExpiredPasswordEnabled, and set the value data to 1.  If it already exists, simply change the value data to 1.

 - Close regedit, open the command prompt and type 'iisreset /noforce' to restart IIS.

Change Password registry edit

Tuesday, March 18, 2014

Exchange Connectivity Analyzer returns An HTTP 403 forbidden response was received.

Exchange Connectivity Anylyzer (testconnectivity.microsoft.com) returns "An HTTP 403 forbidden response was received." when performing a Exchange Activesync test.

This error is typically caused by not allowing non-provisionable devices in your Microsoft Exchange Activesync policy.  Check the box to allow non-provisionable devices in order to utilize the Exchange Connectivity test to troubleshoot.

Exchange 2007, you set a http redirect on the default web site and find you are unable to remove the redirect on the legacy subfolders.

In Exchange 2007, if you set a http redirect on the default web site and find you are unable to remove the redirect on the legacy subfolders you may receive an error "There was an error while performing the operation." "Error: Cannot write configuration file."


These are legacy folders for Exchange 2003 users and don't have a physical path.  To remove the redirect-

1) Go to the command prompt
2) Navigate to C:\Windows\System32\Inetsrv.
3) Enter each of these commands-
appcmd set config "Default Web Site/autodiscover" /section:httpredirect /enabled:false -commit:apphost
appcmd set config "Default Web Site/ews" /section:httpredirect /enabled:false -commit:apphost
appcmd set config "Default Web Site/Exadmin" /section:httpredirect /enabled:false -commit:apphost
appcmd set config "Default Web Site/Exchange" /section:httpredirect /enabled:false -commit:apphost
appcmd set config "Default Web Site/Exchweb" /section:httpredirect /enabled:false -commit:apphost
appcmd set config "Default Web Site/Microsoft-Server-ActiveSync" /section:httpredirect /enabled:false -commit:apphost
appcmd set config "Default Web Site/owa" /section:httpredirect /enabled:false -commit:apphost
appcmd set config "Default Web Site/oab" /section:httpredirect /enabled:false -commit:apphost
appcmd set config "Default Web Site/Public" /section:httpredirect /enabled:false -commit:apphost
appcmd set config "Default Web Site/rpc" /section:httpredirect /enabled:false -commit:apphost
appcmd set config "Default Web Site/rpcwithcert" /section:httpredirect /enabled:false -commit:apphost

4) Run iisreset/noforce.

Saturday, March 15, 2014

Search your entire LAN for a PST or for users saving data to their local computers!

Came across this on an Internet forum I am on.

Ever want to search your entire Lan for PSTs?  Or to see if users are storing files on their local computers?

LAN Search Pro is a FREE network search utility that will scan your entire network for certain file types!

http://www.softperfect.com/products/lspro/

Monday, March 3, 2014

Exchange 2013- Blank ECP / OWA screen, event ID 15021 HttpEvent in system event log.

You have an exchange 2013, after some unknown event nobody can get to OWA or ECP (or any other IIS based resource including outlook.)  Instead, users get a login screen then a blank page.  In the system event log, you see hundreds of id 15021 on the source HttpEvent that say “An error occurred while using SSL configuration for endpoint 0.0.0.0:444.  The error status code is contained within the returned data.” 

-          Open the Command Prompt
-          Run-
netsh http show sslcert
-          This will show the certs, copy and paste this information into notepad.  Under     IP:port   : 127.0.0.1:443, note the certificate hash and application ID.
-          Run this command-  (Yes, I know there is no :444 listed in the output from the earlier command.)
netsh http delete sslcert ipport=0.0.0.0:444
-          Run this command.  Replace certhas with the certificate hash and appid with the application ID you saved in notepad.
netsh http add sslcert ipport=0.0.0.0:444 certhash=123123123123123 appid="{123123123123-1231231235}"

-          Reboot the server.

Thursday, February 27, 2014

Looking for an easier way to audit (Track or Report) windows logon / logouts?

This comes up a lot, that internal admins or management wants the ability to track user's logons, only auditing is to complex to navigate.

The traditional way is to enable event log auditing of logons.  In order to accomplish this, your domain will need to be configured to audit logon events.  To do this, you'd create a GPO and set "Audit account logon events" to both success and failure.  This is done under "Computer Configuration\Windows Settings\Security Settings\Local Policies\Audit Policy."  Once this is configured, you can utilize the tool ADAudit+ to generate reports based on this information.  http://www.manageengine.com/products/active-directory-audit/user-logon-audit-reports.html#workstation.

Another simple approach can be done via login scripts.
 - Create a shared folder on the network. Everyone should have full access to this share.  In my example, I'll use "access"
 - In that folder, create a folder called User and a folder called Computer (just whichever one you want to use).
 - Create a Login.bat batch file-
          Name- Login.bat
          Option 1 -          
          rem The following line creates a rolling log file of usage by workstation
          echo Log In %Date% %TIME% %USERNAME% >>                        
          \\server\access\computer\%COMPUTERNAME%.log
         
          Option 2 -          
          rem The following line creates a rolling log file of usage by user
          echo Log In %Date% %TIME% %COMPUTERNAME% >> \\server\access\user\%USERNAME%.log
 - Create a Logout.bat batch file-
          Name- Logout.bat
          Option 1 -  
          rem The following line creates a rolling log file of usage by workstation
          echo Log Off %Date% %TIME% %USERNAME% >> \\server\access\computer\%COMPUTERNAME%.log

          Option 2 -
          rem The following line creates a rolling log file of usage by user
          echo Log Off %Date% %TIME% %COMPUTERNAME% >> \\server\logs\user\%USERNAME%.log
 - Put these files in the Access shared folder.
 - Create a GPO, Under "User Configuration\Windows Settings\Scripts", add login.bat to the Logon Scripts box and logout.bat to the Logout Scripts box.

Using cleanmgr.exe (Disk Cleanup) to cleanup old service packs and system files in Windows Server 2008 R2

Windows  7 and Windows 2008 R2 include a cool feature as part of the disk cleanup wizard that allows you to remove old service pack backup files to free up space on your C: drive / partition.  Unfortunately it means installing the Desktop Experience which, besides having a bunch of crap you don't need, requires a reboot.

There is another (and better) way!

Simply copy cleanmgr.exe to C:\Windows\System32. from-
C:\Windows\winsxs\amd64_microsoft-windows-cleanmgr_31bf3856ad364e35_6.1.7600.16385_none_c9392808773cd7da\cleanmgr.exe

and copy cleanmgr.exe.mui to C:\Windows\System32\en-US.
C:\Windows\winsxs\amd64_microsoft-windows-cleanmgr.resources_31bf3856ad364e35_6.1.7600.16385_en-us_b9cb6194b257cc63\cleanmgr.exe.mui

(You can also just go into C:\windows\winsxs and search for those two files.)

Now you can simply run cleanmgr.exe (you may need to navigate to it and run as administrator if you have UAC turned on) and select "Service Pack Backup Files".


Wednesday, February 19, 2014

How to upgrade an ASA OS remotely using FTP.

Sometimes I'm required to upgrade a Cisco ASA's OS remotely.  Most Cisco admins are familiar with upgrading the OS using TFTP.  Because TFTP uses UDP, remotely sending the OS via TFTP is not a good idea.  (I'd tell you a joke about UDP, but you might not get it.)

To upgrade via FTP-
I use a FileZilla active mode FTP server.  So first, disable passive mode.

configure terminal
no ftp mode passive

Then, use this copy command-
copy ftp://<Username>:<Password>@<IP Address>/asa825-k8.bin disk0:/asa825-k8.bin

So in my case- (using a fake invalid IP)
copy ftp://cisco:Passw0rd@107.12.631.147/asa825-k8.bin disk0:/asa825-k8.bin

Next you're going to want to check the checksum.  If you go to cisco.com, support, and find your product's software downloads, you can see the checksum by hovering over the file.

Use the command-
verify /md5 disk0:/asa825-k8.bin 97951eea5b35e0544ca9242e6818b39f

Once the checksum is verified, simply change your boot command-
boot system disk0:/asa825-k8.bin
..and remove any old boot system commands.

Use your ipad as a second monitor!

This is great for road warriors who are already carrying a laptop and an iPad.

Need a 2nd monitor that's light and easy? You can leverage your iPad as a 2nd monitor for your computer in Extended Desktop mode!

AirDisplay from Avatron.
http://www.avatron.com/apps/air-display/

Installs a tool on your PC/Mac, and an app on IOS.  Cost is $10. Works over WIFI. Pretty slick.

Tuesday, February 18, 2014

Why is my NIC labeled "Local Area Connection 2" or why am I getting the message "IP address you have entered for this network adapter is already assigned to another adapter"?

Say you notice that your network adapter is labeled "Local Area Connection 2" or you get a message that says "The IP address you have entered for this network adapter is already assigned to another adapter" when attempting to assign a static IP address.

This happens because you have a previous 'removed' network adapter that hasn't been removed in Windows.  This may be a little confusing, especially on virtualized machines.  Each NIC has a unique MAC address, so whenever a new one is installed a new adapter is created in Windows.  Removing the old ones is actually pretty simple.

 - Go to your Command Prompt.  (In 2008 and above, you need to right click on the command prompt icon and run as administrator)

 - From the command prompe, type
SET DEVMGR_SHOW_NONPRESENT_DEVICES=1
and hit Enter.

 - Then (again from the command prmopt) type
START DEVMGMT.MSC
and hit Enter.

 - Device manager will start, in device manager click the View menu and select "Show hidden devices".

 - Now under Network Adapters you will see the old network adapter and can remove it.

Monday, February 17, 2014

Why is Windows 8, 8.1, 2012, 2012 R2 not rebooting during the automatic updates maintenance window???

Have you had a client want to throw their computer out the window because Windows 8 rebooted right in the middle of their important conference call for no apparent reason?  And they wonder, weird, I had my computer sitting idle all night doing nothing, why didn’t it reboot then?

Well, some idiot at Microsoft designed it this way.  The thinking was something like, ‘I guess we don’t want to reboot at 3 AM in case something is open, so we’ll wait until 3 days after updates are installed, then start annoying the user with a restart timer once there is activity on the PC, which will force a reboot if ignored.”  The hilarious thing is, this affects 2012 Server.  So admins who enabled automatic updates suddenly find production servers rebooting in the middle of the day!  Nice job, Microsoft! 

There is a fix.  In 2012 R2 and 8.1 there is a group policy setting to change this behavior-
Computer Configuration\Administrative Templates\Windows Components\Windows Update\Always automatically restart at the scheduled time

On windows 8 and 2012, you need to install the update rollup http://support.microsoft.com/kb/2883201

By default this behavior will still exist though unless you change that GPO.


Thursday, February 13, 2014

Configuring Telnet or SSH access across a VPN tunnel on a Cisco ASA (8.4+ - 9.1)

Want to enable telnet / ssh management of a Cisco ASA across a VPN tunnel?

In 8.2 and below, you simply use the command:
management-access inside

You may have noticed in post 8.4 that no longer works.   In post 8.4, you need to add the route-lookup command to your VPN nat statement.
management-access inside

nat (inside,outside) source static LocalSubnet LocalSubnet destination static RemtoeSubnet RemoteSubnet route-lookup

Of course, you need to enable telnet or ssh-
ssh 0.0.0.0 0.0.0.0 inside
telnet 0.0.0.0 0.0.0.0 inside

(But don't use telnet, it's ghetto and insecure.)

Wednesday, February 12, 2014

Moving DHCP from one server to another and keeping all leases.

Moving DHCP from one server (2003-2012) to another, preserving all settings AND MOST IMPORTANTLY leases!

1.   Log on to the source DHCP server by using an account that is a member of the local Administrators group.
2.   Click Start, click Run, type cmd in the Open box, and then click OK.
3.   Type netsh dhcp server export C:\dhcp.txt all , and then press ENTER.

Configure the DHCP server service on the new server.
1.   Click Start, click Administrative Tools, click Server Manager. If needed acknowledge User Account Control.
2.   In Roles Summary click Add Roles, click Next, check DHCP server, and then click Next.

Import the DHCP database
1.   Copy the exported DHCP database file to the local hard disk of the new server.
2.   Verify that the DHCP service is started on the new server.
3.   Click Start, click Run, type cmd in the Open box, and then click OK.

4.   At the command prompt, type netsh dhcp server import c:\dhcp.txt all , and then press ENTER, where c:\dhcp.txt is the full path and file name of the database file that you copied to the server.

Friday, February 7, 2014

How to log into Windows Server 2008-2012 DC without knowing domain name OR how to log into a machine without knowing the local computer name.

Have you ever tried to RDP into a Windows Server 2008-2012 server and either a) wanted to log into a DC and didn't know the domain name or b) wanted to log as using the local ‘administrator’ account but don’t know the PCs name?

In either scenario, simply put .\administrator

If it’s a domain controller, you’ll log in as the domain\administrator, if it’s not you’ll log into the local administrator account.

Thursday, February 6, 2014

Some cool websites (IT Tools)-

How about some cool websites?

Want to install and be able to update a bunch of common programs with one installer?

Want to monitor up to 100 domains for free, monitor for expiration date, DNS changes, etc.?

Need to mount an ISO on Windows 7?  (Or, 8 of them?)

Need to boot off of a CD or USB stick to scan a computer for viruses?

Need to extract ANY type of archive?

Want to know EVERYTHING about a computer?

Want to export mailboxes from an Exchange database file to a PST?

Wednesday, February 5, 2014

Turning on RDP Remotely (Windows XP and Windows 7)

Ever take a late night call from a user who is trying to remote into their office computer and you need to enable RDP remotely so they can get in remotely?  Assuming a domain environment it is pretty easy.  This was easy in Windows XP, you could remote connect to the registry and turn it on.  Win 7 blocks that.

For Windows 7-
From the server,
psexec \\machinename reg add "hklm\system\currentcontrolset\control\terminal server" /f /v fDenyTSConnections /t REG_DWORD /d 0

One minor issue, this doesn’t poke a hole in the windows firewall.  You’ll need to temporarily disable it, log in, add RDP to the profile, then turn it back on.  From the server-
netsh -r ComputerName -u Username -p Password -c advfirewall set allprofiles state off

That will shut off the firewall.  You can now RDP into the box and open RDP in the GUI in Windows Firewall, then turn it back on.

For Windows XP-
Just go into Regedit, File, Connect Network Registry.  Once connected go to HKLM\SYSTEM\CurrentControlSet\Control\Terminal Server
Change fDenyTSConnection to 0


If you need to turn off windows firewall, you can go to Computer Management, connect to the box, and stop the windows firewall service.  (DO NOT attempt this in Windows 7).

Saturday, February 1, 2014

Adam's tips-


Great SFTP server- Crush FTP.  Has a nice web interface to file shares as well, easy to configure.
http://www.crushftp.com/features.html

==============================================================

Some pretty sweet tools-
http://www.cjwdev.co.uk/Software.html

Notably-
AD Photo Edit- Allows easy upload of photos into AD
AD Info- A cool AD reporting tool for users, computers, groups, printers, etc.
Service Credential Manager- Changes service accounts on multiple servers at once.  Great for changing an admin password, it can automatically search out and update
Group Manager- A tool that allows users to administer groups they are assigned as the manager of.
AD Permission Reporter- Provides a report on your AD pertmissions

As well as a bunch of other tools.

==============================================================

SO if you ever need to set up a windows DHCP server but can’t authorize it because no AD server is available?  Works on 2008-2008R2 (not sure about 2012).
Here is a handy registry key to bypass authorization-
Add this key:
HKEY_LOCAL_MACHINE\SYSTEM\CurrentControlSet\Servic es\DHCPServer\Parameters
Name: DisableRogueDetection
Type: REG_DWORD
Data: 0x1
and restart the server (only restarting the service will not help)

==============================================================

Need a tiny TFTP server that doesn't require anything be installed?  TFTPD32 is your answer.

http://www.firewall.cx/downloads/doc_download/19-4-tftpd-32-.html
https://a5-downloads.phpnuke.org/en/c74258/tftpd32-free-download-full-review

==============================================================

On a Cisco ASA, ever need to see either the client IPSec VPN or Site to Site (L2L) tunnel Pre-Shared-key (pre shared key)?

Use this command-
more system:running-config

It will show you the config with the preshared key/

==============================================================

Ever need to grab your Public IP from the command line in Linux?

content=$(wget ipecho.net -q -O -)
echo $content

==============================================================

Ever need to change the MTU size in windows?  Below will change it to 1452.

netsh interface ipv4 show subinterfaces

netsh interface ipv4 set subinterface "Local Area Connection" mtu=1458 store=persistent

Doing a ping larger than 1458 with the -f (no fragment command) should now fail-
ping 8.8.8.8 -f -l 1472

==============================================================

Want to enable DNS Lookup on your Cisco ASA?

dns domain-lookup outside
dns server-group Default DNS
name-server 8.8.8.8

==============================================================

Want to measure bandwidth from individual users on an ASA?
What to explore QOS issues?
Spot inappropriate internet use on an ASA/

http://www.fireplotter.com/index.php?option=com_content&view=article&id=3&Itemid=154

Product is FREE for watch only mode.  I'd be happy to assist getting it up and running if you have this need.

==============================================================

Ever run into that quirky VMware issue on a Dell PowerEdge server where you try to create a datastore and your vsphere client disconnects you?  You need to delete the Dell diagnostics partition on the disk.

1.       Enable SSH via console
2.       Connect to VM host via SSH
3.       Run the following to get a list of current LUN paths:
esxcli storage core path list
4.       Record the ‘Device’ value for the device that shows ‘Unavailable or path is unclaimed’ at ‘Adapter Transport Details’ or ‘Target Transport Details’
5.       Run the following to change the label on the partition:
partedUtil mklabel /dev/disks/<device> msdos
6.       Retry datastore creation operation in vSphere
==============================================================

Ever need to download software that was pre-installed on a Dell system?

==============================================================

Ever need to get the Cisco IPSec Client working on Windows 8?

There is a work-around.

1. Press Windows Key+R to open the run prompt > regedit {enter}

2. Navigate to;HKEY_LOCAL_MACHINE>SYSTEM>CurrentControlSet>Services>CVirtA

Locate the DisplayName > Edit its value > Delete all the text to the LEFT of "Cisco Systems VPN Adapter for 64bit Windows."

==============================================================

Want to easily review blue screens (BSOD)?


==============================================================

Ever need to turn on RDP on Windows 7 remotely?

psexec \\machinename reg add "hklm\system\currentcontrolset\control\terminal server" /f /v fDenyTSConnections /t REG_DWORD /d 0

==============================================================

Ever need to check if inheritable permission is checked on all AD accounts?  This script will do that, just save it as a .vbs files-

Option Explicit

Dim objRootDSE, strDNSDomain, adoConnection
Dim strBase, strFilter, strAttributes, strQuery, adoRecordset
Dim strNTName, strDN, intNtSecDescCntrl
Dim objUser, objSecurityDescriptor, strInheritable

Const SE_DACL_PROTECTED = &H1000

' Determine DNS domain name.
Set objRootDSE = GetObject("LDAP://RootDSE")
strDNSDomain = objRootDSE.Get("defaultNamingContext")

' Use ADO to search Active Directory.
Set adoConnection = CreateObject("ADODB.Connection")
adoConnection.Provider = "ADsDSOObject"
adoConnection.Open "Active Directory Provider"

Set adoRecordset = CreateObject("ADODB.Recordset")
adoRecordset.ActiveConnection = adoConnection

' Search entire domain.
strBase = "<LDAP://" & strDNSDomain & ">"

strFilter = "(&(objectCategory=person)(objectClass=user))"

' Comma delimited list of attribute values to retrieve.
strAttributes = "distinguishedName,sAMAccountName"

' Construct the LDAP query.
strQuery = strBase & ";" & strFilter & ";" & strAttributes & ";subtree"

' Run the query.
adoRecordset.Source = strQuery
adoRecordset.Open

' Enumerate the resulting recordset.
Do Until adoRecordset.EOF
  ' Retrieve values.
  strNTName = adoRecordset.Fields("sAMAccountName").Value
  strDN = adoRecordset.Fields("distinguishedName").Value
  strDN = Replace(strDN, "/", "\/")
  Set objUser = GetObject("LDAP://" & strDN)
  Set objSecurityDescriptor = objUser.Get("ntSecurityDescriptor")
  intNtSecDescCntrl = objSecurityDescriptor.Control
  If (intNtSecDescCntrl And SE_DACL_PROTECTED) <> 0 Then
    strInheritable = "Allow inheritable permissions disabled"
  Else
    strInheritable = "Allow inheritable permissions enabled"
  End If
  Wscript.Echo strNTName & ";" & strDN & ";" & strInheritable
  adoRecordset.MoveNext
Loop

' Clean up.
adoRecordset.Close
adoConnection.Close

Monday, January 27, 2014

Setting up Veeam to use USB drives as an offsite backup.

I had a frugal customer have the need for me to utilize USB hard drives as an offsite backup with Veeam.  There were a few goofy challenges involved in doing this, so I thought I’d summarize it for you all.  First, I know of the existence of backup copy jobs in Veeam.  They are too complicated for my needs.  I simply want a FULL backup to USB in addition to the incrementals my regular job makes.  Why?  Well, say my incrementals are corrupt some how?  Maybe I don’t need to back up EVERY VM for offsite?  Plus I don’t need all of the retention of the incrementals on my main job.

Windows-
The challenge here is, you need to keep the drive letter the same when the client rotates the drives.  I utilized a utility called USBDLM.  It’s a pretty simple utility, but I had to play with it to basically figure out that it does a LOT more than we need it to.
-          Download USBDLM from http://www.uwe-sieber.de/usbdlm_e.html#download
-          Unzip them into C:\Program Files\USBDLM
-          Create a file called USBDLM.INI, in it put the following and NOTHING ELSE.  I used drive letter “A”, but you can use whatever you want.
[DriveLetters]
Letter1=A
-          Run the _install batch file to install it as a service, run the _start batch file to start it.

From here on out, whenever you connect ANY USB drive it will always be the drive letter specified in the USBDLM.INI.

Veeam-
Pretty straight forward, set up.  First you’re going to create a repository.  Make sure your first USB drive is connected, make a directory to store your backups (if you want, you don’t have to).
-          Open Veeam, go to Backup Infrastructure, and click on Backup Respositories.
-          Right click, Add Backup Repository.
-          I called mine “Offsite”, hit next, leave “Microsoft Windows Server”, hit next, Leave it on “This server”, hit populate.
-          Select your USB Drive.  (A:\ in my case).
-          Select the path you want to back up to.  (A:\Veeam) in my case.
-          Uncheck Enable vPower NFS, Next, Next, Finish.

Now, set up your offsite job.
-          Go to Backup & Replication, Jobs, Backup.
-          Right Click, Backup.  Name the job whatever you want, click next.  (I called mine Offsite)
-          Add the VMs you want to back up.  NOTE- you can remove certain ‘disks’ if you don’t need them to be offsite.  I have giant 4 TB drives, but if I didn’t, I might need to remove the C: drive of my file server for example…  Do this by clicking on Exclusions, Disks, Edit.  Hit Next.
-          Select your Offsite backup repository, change “Restore points to keep on disk” to 1.
-          Click Advanced, set backup mode to Incremental.  (NOT reversed incremental).  Make sure “enable synthetic fulls” is UNchecked.  Check the box under “Active Full Backup” that says “Perform Active Full Backups periodically.  Set the Weekly on selected days to the day of your offsite, Saturday in my case.  Hit OK, then Next.
-          Leave Image Processing and file system indexing unchecked.
-          Schedule your job to run on the day you want, in my case every Saturday night at 10:00 PM.
-          Hit Next, then Finish.

Last but not least, your jobs are going to fill up your hard drive and stop working.  You need to create a batch file to clean this up.  I made a folder on C:\ called DiskCleanup, then made a batch file with this in it-

forfiles -p "A:\Veeam\Offsite Job" -s -m *.* /D -45 /C "cmd /c del @path"


This file will delete backups over 45 days old, which leave me TWO fulls on each drive.  You might need to change the days to less if you only want it to keep one.  Then, make a scheduled task to run your batch file every week.